Element
Function
RIC elements
How is the internal structure of a RIC file? The normal graphic files contain a header which includes information about the size of the internal bitmap and some information about the used colours. At the end there is a binary field which contain the pixels of the image. RIC files are a little bit different! Of course there is also an area where you can store the bitmap of a monochrome image – but there are also some other elements inside which can be used for displaying something on the NXT screen:
Every RIC file contains by one or more of those RIC elements and will be interpreted sequential when you call the RIC file on your NXT. The RIC files which comes with the NXT system - or were created with the old version of nxtRICedit - contains only these three elements:
You don't need additional parameters for displaying normal RIC files. With the following usage with NXC you can display the RIC file on the NXT screen:
|
task main()
; |
But this simple call of a RIC file is able to display more than only one picture on the NXT when you design your RIC files with other RIC elements!
The big advantage of RIC files will be visible when you use the extended function GraphicOutEx( ). Therefore you can add an array which contains values for dynamic displaying of the RIC file:
|
task main() int parameter[ 3 ];
parameter[ 0 ]= 10; parameter[ 1 ]= 2; parameter[ 2 ]= 40;
; |
This method will open the new world of RIC functions which were hidden until now!
The default firmware which is part of the NXT system supports up to 16 parameters (array index 0 to 15). The corrected and advanced version of the firmware by John Hansen enables up to 256 parameters (array index 0 to 255) which can be used for calling GraphicOutEx( ).
Someone of you will ask why we need so many parameters? You need more knowledge about the RIC elements for answering this question! Normally you can define most of the attributes of the RIC elements on three different methods:
| Parameter type | Display | Function | ||||||||||
|
Constant |
|
The value of the constant will be defined during the design phase of the RIC element and can’t be changed afterwards on usage of the RIC file. The value range is from 0 to 4195 ( 0x0000 0x0FFF) |
||||||||||
|
Parameter |
|
Here you can define to an index to the parameter array which will be used for later usage in the program. So you can forward an dynamic parameter to the RIC file during runtime. The value for the index is dependent of the version of the firmware which will be used inside the NXT:
You can
change the total count of parameters by using the menu entries File
»
Settings
»
Parameters or by pressing the buttons
|
||||||||||
|
VarMap |
|
By using VarMaps you can translate the value of a defined parameter to a new value which will be used during the runtime. The left value define the VarMap, which must be defined earlier in the RIC element list, and the right parameter is the index of the parameter which includes the value which should be transferred to a new value.
You have the same limitation for the VarMap like it was the case for the Parameter: You only can use parameters which will be supported by the firmware inside the NXT. |
Creation of a new RIC file
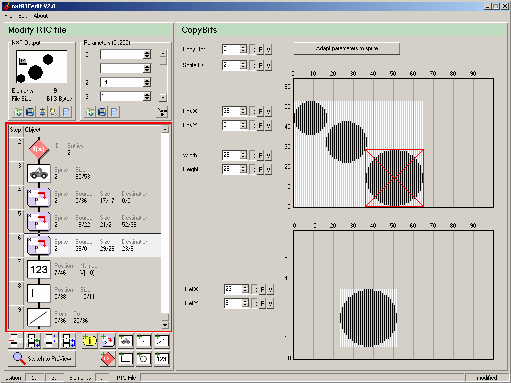
You can use any of the nine RIC elements for creating a RIC file. All those RIC elements will be arranged in a row like pearls on a string – but the string is only vertically and begins on the top and new elements will be added at the bottom end (see red marked area):

It's quit simply to add a new RIC element - you only have to press one of the following buttons at the left bottom side of the window.
|
|
|
Add the RIC element Information at the end of the list |
|
|
|
Add the RIC element Point at the end of the list |
|
|
|
Add the RIC element Line at the end of the list |
|
|
|
Add the RIC element Rectangle at the end of the list |
|
|
|
Add the RIC element Circle at the end of the list |
|
|
|
Add the RIC element NumBox at the end of the list |
|
|
Add the RIC element Sprite at the end of the list | |
|
|
|
Add the RIC element CopyBits at the end of the list |
|
|
|
Add the RIC element VarMap at the end of the list |
Naturally you can change the order of the RIC elements inside the RIC file afterwards:
· Rearrange the RIC element by moving with the mouse
· Delete the selected RIC element by pressing the DEL key
· Use one of the following buttons for manipulation of the list of RIC elements
|
|
|
Delete the selected RIC element from the list |
|
|
|
Create a copy of the selected RIC element and place it on next position |
|
|
|
Change the position of the selected RIC element with the predecessor |
|
|
|
Change the position of the selected RIC element with the successor |