Example for RIC file: Pong
Anybody knows the little game Pong! Both players control a little paddle at the side of the screen and a ball will move between them. The player who misses the ball will get a point – and the player who reached first 9 points loses the game. Of course you already can use native drawing commands of the NXT for displaying the playing field, paddles, the ball and the counter for the points. But you need more programming code for the same displaying, you are limited and you can’t modify the look and feel afterwards.
The following example should show how you can realize the complete display – including the counter for the points – by using only one call of a RIC file!
|
Element |
Realized by |
Parameter |
Comment |
|
Counter for left player |
NumBox |
0 : Points |
Count of points for left player |
|
Counter for right player |
NumBox |
1 : Points |
Count of points for right player |
| Upper limitation | Line | Static element | |
| Middle line | Line | Static element | |
|
Bottom limitation |
Line |
|
Static element |
|
Left paddle |
CopyBit 3 x 8 Pixels |
2 : Y-Pos |
Vertical position of left paddle |
|
Right paddle |
CopyBit 3 x 8 Pixels |
3 : Y-Pos |
Vertical position of right paddle |
|
Ball |
CopyBit 5 x 5 Pixels |
4 : X-Pos 5 : Y-Pos |
Position of Ball |
Now we have 8 RIC elements – but we need more than only 8 RIC elements because we need an additional Sprite element which contains the images for both paddles and the ball!
On the following steps we will create a RIC file which generate the following output for the little game Pong:
|
Step |
Description |
||||||||||||||||||||||||||||||||||||
|
0 |
Start the program nxtRICeditV2 and create a niew RIC file. |
||||||||||||||||||||||||||||||||||||
|
1 |
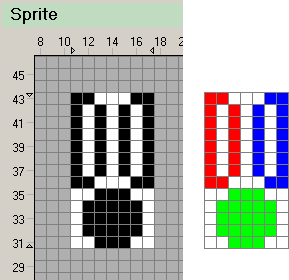
Insert a new Sprite element which contains the image for the ball and both paddles. Add the sprite element by pressing on the following button:
Afterwards you have to create a image like this:
The position of the image on the available drawing area isn’t important because only the used pixels will be stored in the file. If you make a mistake during creation of the image so you can correct it every time and reduce the used area by pressing the following button:
|
||||||||||||||||||||||||||||||||||||
|
2 |
On the next step we will add two NumBox elements for displaying the points of each player at the end of the RIC list. Add them by pressing twice the following button:
Both NumBox elements are the first elements which needs a parameter for the output. Therefore you should define the attributes of the NumBox elements like this:
Yellow marked fields must be defined as a parameter! If you change the values of parameter 0 and/or 1 than you can see immediately the change in the preview of the RIC file. |
||||||||||||||||||||||||||||||||||||
|
3 |
Now we have to insert three Line elements which will be used for the limitation of the play field. Add them by pressing three times the following button:
The attributes for start and end point of all three lines can be defined with the mouse or by direct input into the attribute fields:
|
||||||||||||||||||||||||||||||||||||
|
4 |
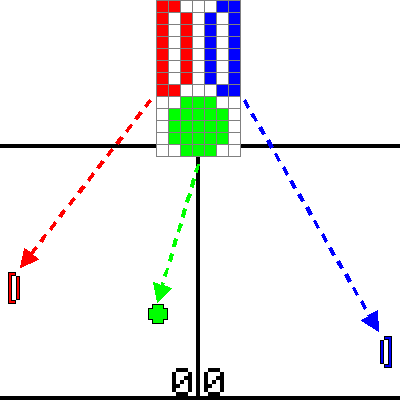
After the simple RIC elements we have to add three CopyBits elements by pressing three times the following button::
Addapt the settings for the attributes of all three CopyBits elements like this:
Yellow marked fields must be defined as parameters! After defining all three CopyBits the colourized areas will be dynamically copied on the NXT screen as following:
|
||||||||||||||||||||||||||||||||||||
| 5 | Dont forget to save the RIC
file with the file name Pong.ric! As you can see in the upper left corner the RIC file for displaying the complete Pong game have a size of 149 bytes only! When you try to do the same with normal drawing commands you need more space in the memory of the NXT! |
||||||||||||||||||||||||||||||||||||
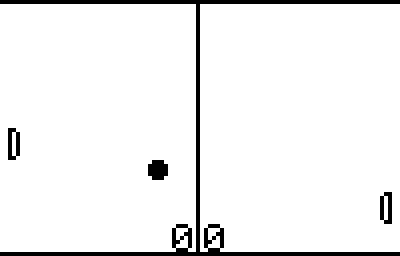
After defining all RIC elements of your RIC file for the game pong, you can take a look to your work by pressing the following button:
![]()
When you change the parameters from 0 to 5, you can see in the PreView area immediately the new output. On the same way you have to do the call of the RIC file within your own program. The following part of code should show on which way you can do this:
|
task main() int pong[ 6 ];
pong[ 0 ]= 0; // Points of left player pong[ 1 ]= 0; // Points of right player pong[ 2 ]= 28; // Vertical position of left player pong[ 3 ]= 28; // Vertical position of right player pong[ 4 ]= 37; // Horizontal position of ball pong[ 5 ]= 19; // Vertical position of ball
// Draw complete Pong-Display with one call of RIC file!
; |
For the game itself you have to build a loop inside the program for periodically update of the display and you have to set all 6 parameters before you call the RIC file pong.ric. The position of the left and right paddle can be read from rotation sensor of the NXT motors. One of the possible implementations of the game Pong you can find here: Pong.nxc