Example for RIC file: New font
Next example shows one possible implementation of a wish which I got from some owners of the NXT: A new font for NXT. Whatever it’s smaller or bigger than the standard font of NXT which is coming with matrix of 6x8 – with a special RIC file and some additional lines of code you can realize this wish!
At the beginning you have to answer the question how big the new letters should be. For our example we will use a matrix of 10 x 10 pixels. And for better understanding we will ad a black column on the left side and also a black line at the bottom:
Naturally you can dispense such limitation. But for the moment it will help for better understanding of the structure of the RIC file.
It’s up to you how many characters you will support with your own font. Most time it’s enough when you only define the characters from 32 up to 128 because characters less than 32 are only special control characters and above 128 you can find special characters which will not often use.
The RIC file, which contains the new font, will be designed like this:
|
RIC element |
Realized by |
Parameter |
Comment |
|
Image for the new font |
Sprite |
|
Contains the image for all available characters |
|
Translation for X position |
VarMap |
|
Base for calculation of the horizontal position of the character |
|
Translation for Y position |
VarMap |
|
Base for calculation of the vertical position of the character |
|
Display the letter |
CopyBits |
0 : Character |
Copy the picture of the character to the NXT screen |
The following steps will describe how you can create the RIC file:
|
Step |
Comment |
||||||||||||||||||||||||||||||||||||||||||||||
|
0 |
Start the program nxtRICeditV2 and create a niew RIC file. |
||||||||||||||||||||||||||||||||||||||||||||||
|
1 |
First you have to add a Sprite element, which will contain the image for all characters of the new font. Add the Sprite element by pressing the following button:
Afterwards you have to create the following image:
It's important that the new Sprite element will have the Sprite ID 1!
Every letter will be defined within a matrix of 10 x 10 pixels. 16 characters each row. Beginning at the lower left edge you will find the letter 32 which is a space:
The position of the image on the available drawing area isn’t important because only the used pixels will be stored in the file. If you make a mistake during creation of the image so you can correct it every time and reduce the used area by pressing the following button:
|
||||||||||||||||||||||||||||||||||||||||||||||
|
2 |
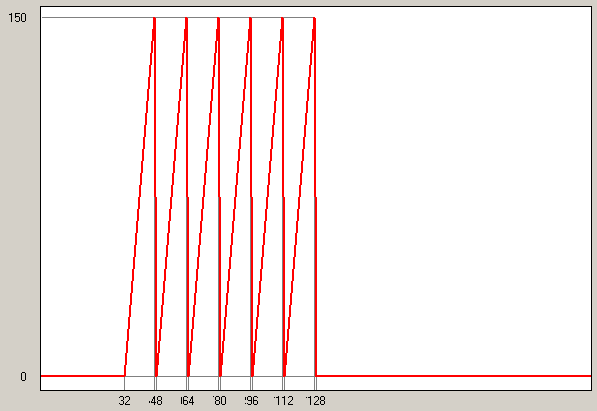
Next RIC element will be a VarMap element. This will be used for translating the number of the character (ASCII value) into a horizontal position of the character within the image which was defined before in the Sprite element. With the advantage of the linear interpolation you don’t have to define an interpolation point for every character! It’s enough when you only define the interpolation point for the first and the last character of each row. With this knowledge the transfer function for the X position will look like this:
It’s easier for you to define the interpolation points by copying the interpolation points from the following table by using the clipboard:
For copying of the list of interpolation points with the domain and range value you can use the following button:
|
||||||||||||||||||||||||||||||||||||||||||||||
|
|
|
||||||||||||||||||||||||||||||||||||||||||||||
|
3 |
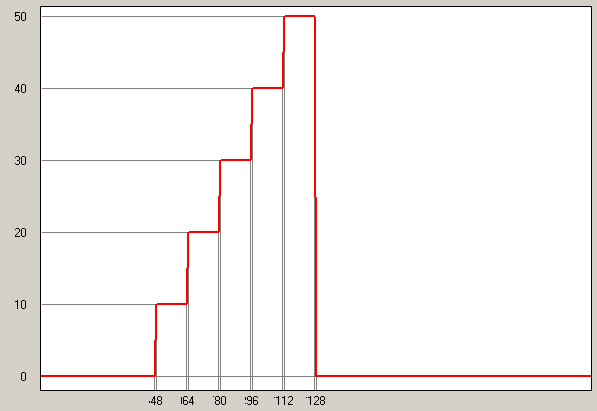
Beside the transfer function of ASCII values for horizontal start position of the copy area we also need a transfer function for the vertical start position. This will also be realized by using a VarMap element. But it looks like a little different from the first one:
You can also simplify the definition of the interpolation points by using the values of the following table:
For copying of the list of interpolation points with the domain and range value you also can use the following button:
|
||||||||||||||||||||||||||||||||||||||||||||||
|
|
|
||||||||||||||||||||||||||||||||||||||||||||||
|
4 |
The last – and also the most important – RIC element will be the CopyBits element, which will copy from the previous defined Sprite element – and by using both VarMap elements – the right copy area to the NXT screen. Press the following button for adding the CopyBits element at the end of the RIC list:
The attributs for the CopyBits element must be set like this:
Light blue marked fields must be defined as VarMap values! |
After defining all RIC elements of the file for new fonts, you can take a look to your work by pressing the following button:
![]()
When you modify the parameter 0, than you should see for the values 32 up to 127, the letter of your new font on the bottom left corner of your display.
This isn’t enough for displaying of a complete text. Therefore you also need some lines of a NXC program. But this isn’t very complex and you can easily reuse it in your own program:
|
void BigLettersOut( int
x, int y, string s )
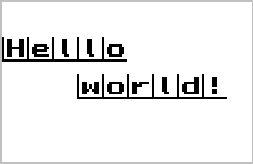
task main() BigLettersOut( 0,40, "Hello" ); BigLettersOut( 30,25, "world!" );
; |
After starting the program you should see the following text on your NXT screen:
The function BigLettersOut( ) can be used in your own NXC program. But you should take care about the incremental factor of 10 (line x += 10). This incremental factor must be adapted to the width of the letters of your own made font. You also can adapt the function for right usage of special characters like “new line” or “tab” – than it’s also possible to produce output with more than 1 line by using the function.